
Sand Hills in Photoshop CS3
Introduction
In this Photoshop tutorial, we will create simple, but somewhat realistic, sand dune-like hills. You should have some basic knowledge of Photoshop, but you wont need to be a pro. Now, lets get started. As stated in the tutorial title, we will be using Photoshop CS3.
Tutorial
To begin, create a new document. I will be working with a size of 256x256 pixels. The background should be transparent, color mode should be RGB. Create the document, and rename "Layer 1" to "Background". Fill it with the color of your choosing, I am using a sky blue color(#38ACEC).
Next, create a new layer, call it "Dunes Close". Grab the Rectangular Marquee tool, and select the region where you want your first layer of sand hills. Pick some sandy colors, I'm using these: #D17C05 for the forground color, and #FDD752 for the background color.
Now go to Filter>Render>Clouds, and hit Ctrl+F a few times till you get the texture you want. Then de-select it by using Ctrl+D. Your document should now look like this:

Now to make it look like hills. Go to Filter>Liquify, and set the brush to a size of your choosing. However I recommend using a high brush size like 85 to get nice looking hills. Now we can start "painting" the hills. Simple move the brush along the edges of the flat ground, holding LMB down, and pan in any direction: Up to create hills, Down to create dips, etc. Use the Reconstruct tool to fix any gaps that might come up from warping the image. Continue to do this until your happy with the image. Note; There may still be some gaps left over from warping the image, if so, go back into Liquify and use a smaller brush to fix these up(Reconstruct tool wont here, though).
Now we should have some nice looking hills:

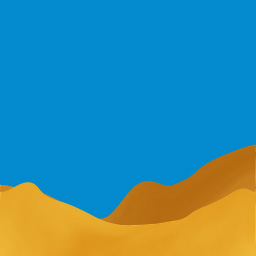
Next, we will add some depth to the image. Make a new layer, move it under the "Dunes Close" layer, and rename it to "Dunes Far". Repeat everything you did with the first Dunes layer, except, make the Rectangular Marquee selection bigger. Now liquify it again, but this time make the hills bigger. Once your happy with the hills, go to Image>Adjustments>Brightness/Contrast. Set Brightness to -50. You can change contrast to if you like, but I'm leaving it the same.
The result of this step is:
Thats it! You have reached the end of this tutorial, and created some simple sand dunes. Dont be afraid to add other things though, you could make a night scene with a starfield as the background(you will have to use darker colors for the dunes though), you could add the sun and some clouds, you can add anything you want. Here is this effect used on a logo:

© COG Productions
Download Tutorial .PSD file
![]()